This article will give overview of CullAi and will go through different user interface elements
Table Of Contents
Overview
CullAi is an AI assistant for professional photographers to select final photos from a photoshoot. It uses AI to auto rate photos based on face capture quality, groups similar photos and auto picks the best ones from those groups.
CullAi calculates AI score of photos by checking for better lit, sharp faces with open eyes. Furthermore, it also detects important people in a shoot and displays faces alongside each photo to quickly check quality manually. Auto Rate, Grouping, Auto Pick, Filters and Fast Previews features help quickly discard obvious bad quality photos.
User Interface - Home View
Photo Groups Grid
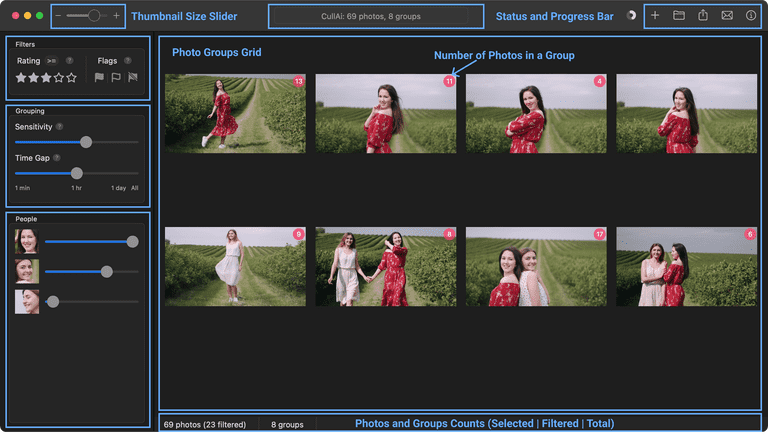
This shows all filtered photo groups in a grid with count of photos in each group shown on top right red badge. While CullAi is analyzing photos you will see 1 cell for each imported photo. Once analyzing and grouping is completed you will see group of photos in each cell. Each cell shows most rated picked photo from the group as thumbnail of that cell. In case no photo was rated in a group it just shows thumbnail of the first photo in that group.
You can scroll vertically to see all groups. You can select photo groups using usual selection methods in macOS, Export and Share actions consider selected photo groups or all in case of no selection. Furthermore, you can also drag these photo groups to other apps.
Photo and Groups Count - BottomBar
This gives you live counts of Final, Filtered, Selected Photos and Groups. Export and Share actions will take selected photos and if none are selected they will take photos matching filtering criteria.
Status and Progress Bar - ToolBar
This gives current state of CullAi, if any action is running it shows live status of that action. For e.g. "Analyzing Photos (34 of 125)..." shows that CullAi is currently analyzing imported photos, and it is currently done with 34 out of total 125 photos. Besides status bar circular progress bar is also shown when some action is going on. Progress bar gives visual representation of how much of that action is done.
Actions - ToolBar
This is group of actions you can take:
- Import Photos - Select Photo(s) and / or Folder(s) to import photoshoot. This opens a File pick modal to import photos. Please check details here.
- Export Photos - Export selected / filtered photos to local or network drive. This opens a Folder pick modal to export photos. Please check details here.
- Share Photos - Share selected / filtered photos to Apple Share compatible apps / services. This opens Apple Share dropdown listing options for sharing like Apple Photos, Mail etc. Please check details here
- Support / Feedback - You can use this to get email support, report a bug or give feedback about your experience. This opens your configured mail client with our support email address pre-filled. Please check details here
- Keyboard Shortcuts - You can use this to open Keyboard Shortcuts modal to refer to them quickly. You can also use ⌘ / to take this action. Please check details here
Thumbnail Size Slider - ToolBar
This slider can be used to adjust size of thumbnails shows in Photo Groups Grid. You can even adjust the default thumbnail size when CullAi is opened in Preferences -> General -> Default Thumbnail Size. Default is set to 128px.
Filters - Left Panel
This panel can be used to filter out photos based on Star Ratings and Flags. These filters live updates Photo Groups Grid. Check details on how filtering works here.
Grouping - Left Panel
This panel can be used to adjust grouping settings like sensitivity and time gap. These settings live updates Photo Groups Grid. Please check grouping settings details here.
People - Left Panel
This panel shows all the detected people in the photoshoot. CullAi automatically detects importance of each person based on how frequently they appear in a photoshoot. Importance can be adjusted using sliders given in front of the person's face. These settings live updates Photo Groups Grid. Please check details about people detection and use here
User Interface - Group Details View
You can open Group Details View by double-clicking one of the photo groups on home view or using keyboard ←↑→↓ and space / enter key.
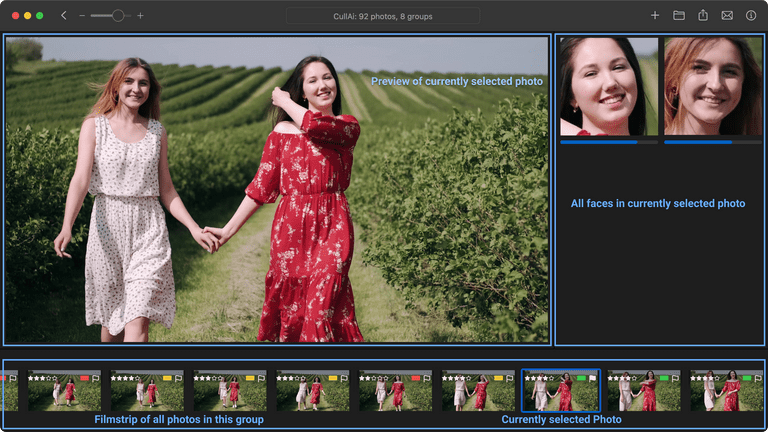
This view is divided vertically in 2 sub-views of Selected Photo details and Filmstrip of all photos in the current group of similar photos. Selected Photo Details sub-view shows details of selected photo from the Filmstrip sub-view and is further divided horizontally in 2 sub-views of Selected Photo Preview and Faces in Selected Photo.
Both vertical and horizontal divisions are adjustable as per your preference. Using this you can change size of previews, faces and filmstrip thumbnails. This adjustment is saved as preference so that next time you open CullAi their sizes will remain same.
This view by default shows the highest rated picked photo in current group. You can browse previous / next photos from same group using ←→ keys and move to previous / next groups using ↑↓ keys.
Filmstrip
This shows all similar photos in current group layered on horizontal filmstrip at bottom. You can scroll this view horizontally to see all similar photos in current group. Every photo in this filmstrip has top overlay of Star Rating, Color Label and Flag. You can see AI assigned ratings and flags and modify them manually. You can modify these and navigate using mouse, menu and keyboard shortcuts. Please check user guide on Ratings, Color Labels and Flags for details.
Preview
This shows preview of currently selected photo in filmstrip. Currently, it doesn't allow manually zooming in, but it is on our to-do list.
Faces
This shows all faces in currently selected photo in filmstrip. It has 2 columns and is vertically scrollable. It also shows face quality score below each face using color bar. Width of color bar shows how good the face quality is in terms of lighting, sharpness and open eyes. This bar also has color indicator, blue indicates high quality, pink indicates medium quality and red indicates low quality.


